I noticed this problem first in my own space. A fresh diffuser fills the room with a soft, continuous aroma for a few weeks. Then one day, the scent fades almost completely. Many people replace the entire setup at this stage. I used to do the same until I understood the reed diffuser refill process and how effective it is as a home fragrance solution.
Learning how to refill reed diffuser changed the way I manage indoor fragrance. It saves money, reduces waste, and gives full control over scent intensity and oil quality. Instead of discarding a good bottle, you simply perform a diffuser oil replacement using the right refill fragrance oil and fresh reeds.
This guide focuses on a practical, tested approach. You will learn the step-by-step reed diffuser refill, how to maintain a consistent aroma, and ways to improve scent diffusion efficiency. I will also share insights from my experience with evaporation and scent dispersion, which directly impact how long your diffuser lasts.
What You Need Before Refilling a Reed Diffuser?
Preparation directly impacts how well your diffuser performs. A proper setup improves absorption, scent clarity, and longevity.
Start with a high-quality reed diffuser oil refill. Choose a fragrance oil type like floral, woody, or citrus based on preference. Good oil ensures better scent consistency and controlled evaporation.
Use a clean diffuser bottle, preferably glass or ceramic. Old residue affects new fragrance, so cleaning before refill keeps the scent pure.
Reeds matter more than most people think. Fiber reeds offer better absorption and consistent diffusion, while bamboo reeds provide a natural look but uneven flow due to lower porosity.
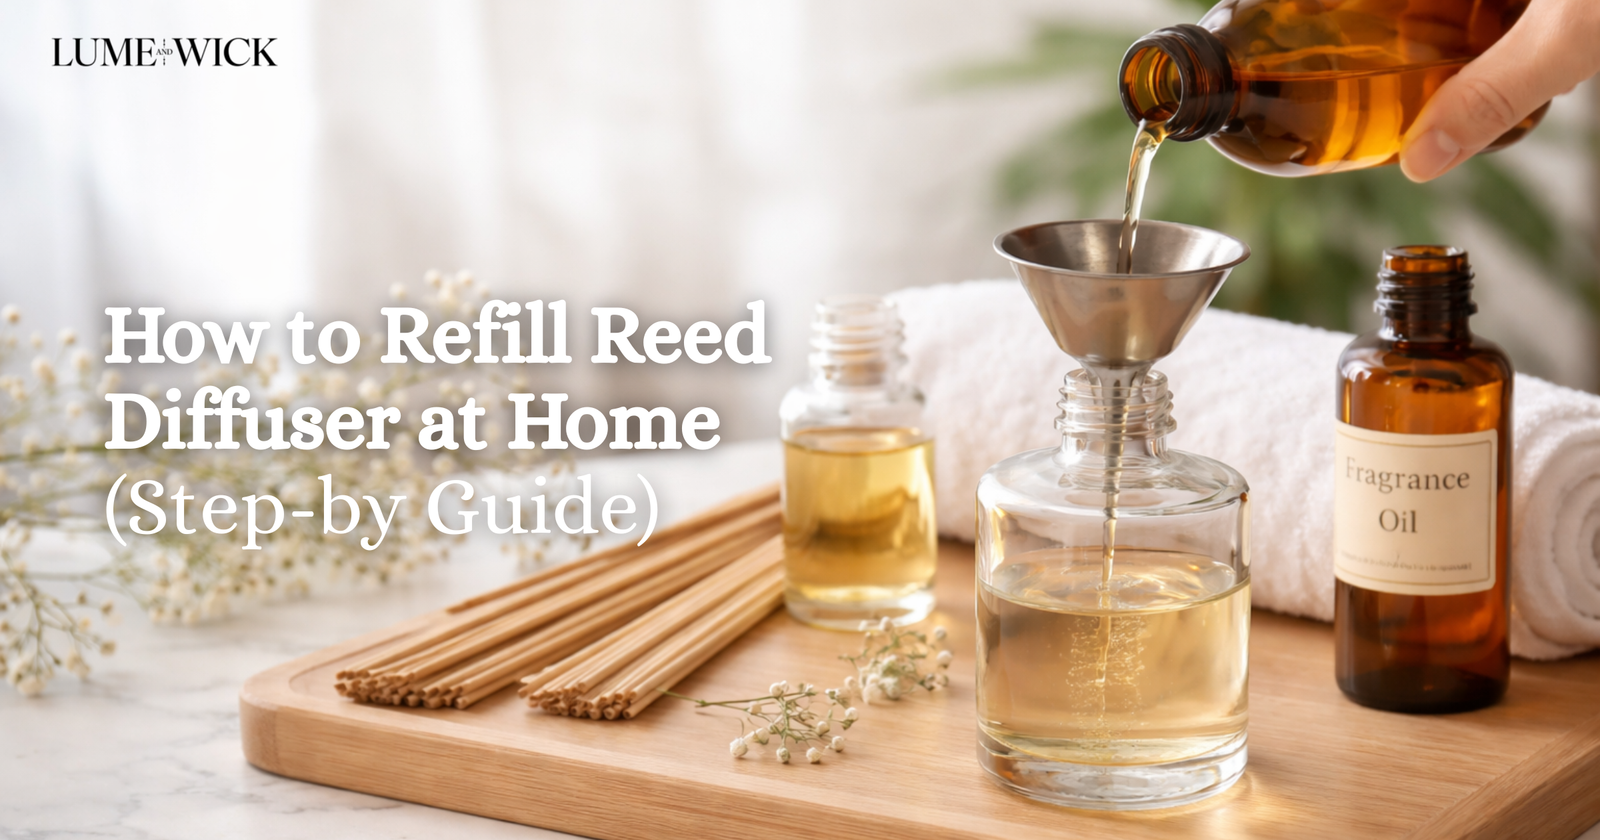
A funnel helps with clean pouring and prevents spills, especially for 100ml or 200ml bottles.
Oil composition is important. A balanced carrier oil vs fragrance oil ratio ensures smooth absorption and avoids clogging. Ready-made oils usually come pre-balanced, while DIY blends require correct proportions.
Also check bottle compatibility. Bottle neck diameter affects how many reeds fit and how fast scent spreads. Narrow openings slow evaporation, while wider ones increase diffusion.
With the right setup, you improve diffuser performance and create a more stable, long-lasting home fragrance.
How to Refill a Reed Diffuser (Step-by-Step Process)
Refilling a diffuser is simple, but precision improves results. The diffuser bottle refilling steps below follow a method I personally use to maintain strong and stable scent output.
Step 1: Empty and Clean the Bottle
Start by removing any remaining oil. Even small residue can affect new fragrance. Clean the bottle using warm water or rubbing alcohol. This step answers a common query about how to clean the diffuser before refill.
Allow the bottle to dry completely. Moisture disrupts oil absorption and reduces scent diffusion efficiency. A clean surface ensures smooth capillary flow.
Step 2: Add Reed Diffuser Oil Refill
Pour the oil slowly into the bottle. If you are wondering how much oil to refill diffuser, fill about 70 to 80 percent of total capacity. For example, a 100ml bottle should hold around 70 to 80ml.
Avoid overfilling. It increases spillage risk and accelerates evaporation rate. A controlled fill supports better diffusion strength, whether you prefer low, medium, or strong intensity.
This step represents the core of the scented oil refill method. Use a steady hand or funnel for precision.
Step 3: Insert New Reeds
Place 6 to 10 reeds depending on desired scent intensity levels and room size. This reed count directly influences how strong the fragrance feels.
Many people ask, can you reuse diffuser sticks. In practice, old reeds become saturated and clogged due to oil oxidation. This reduces absorption speed. I always replace them to maintain consistent flow and improve scent throw improvement.
Different reeds behave differently. Fiber reeds offer faster absorption due to lower oil viscosity resistance, while bamboo reeds absorb unevenly but last longer in certain setups.
Step 4: Flip Reeds for Activation
After inserting, allow the reeds to soak for a few hours. Then flip them once. This technique is known as the reed flipping technique. It initiates upward flow and improves initial fragrance release.
Do not flip frequently. Excess flipping increases evaporation and reduces diffuser longevity optimization. I usually flip once every few days to maintain balance.
Within a few hours, oil travels upward through capillary action in diffuser reeds. This natural process drives fragrance diffusion technique and determines how effectively the scent spreads across the room.
The entire quick diffuser refill method takes around 5 to 10 minutes, but the results last several weeks when done correctly.
When Should You Refill Your Reed Diffuser?
Timing plays a key role in maintaining a consistent aroma. Many people wait until the scent disappears completely, but that approach reduces overall performance. Understanding when to act helps maintain a steady indoor air fragrance without interruption.
The most obvious sign is reduced scent strength. If you notice that the room no longer carries the same aroma, it usually means the oil has dropped below an effective level. In most cases, refill frequency (every 2–4 weeks) works well, depending on room conditions and oil quality.
Another indicator is visible oil depletion. When the liquid level falls significantly, the reeds cannot maintain proper saturation. This directly impacts scent dispersion and reduces overall diffusion strength.
Reeds also give signals. If they appear dry or clogged, they stop absorbing oil efficiently. This happens due to oxidation of fragrance oils over time. When oil thickens or changes structure, it slows down absorption and blocks the flow.
Environmental conditions influence this cycle. High temperature increases evaporation rate (ml per week), while strong airflow from fans or AC units accelerates scent loss. Placement matters more than most people think. A diffuser placed in a balanced environment maintains scent longevity (3–8 weeks) more effectively.
Room size also affects performance. A larger area requires stronger diffusion or more reeds to maintain consistent fragrance coverage. Smaller spaces need fewer reeds to avoid overpowering scent intensity.
From my experience, regular monitoring works better than fixed schedules. Once you understand your room conditions, you can predict when to refill diffuser oil at home without waiting for complete depletion. This approach ensures stable fragrance output and better overall diffuser performance optimization.
Common Mistakes to Avoid When You Refill a Reed Diffuser
The process looks simple, but small mistakes reduce efficiency and waste fragrance oil. I noticed this when my diffuser stopped giving consistent scent even after refilling. Fixing these issues improved performance immediately.
Using pure essential oil without dilution creates thick consistency. It blocks absorption and disrupts fragrance diffusion technique. Always use a balanced base for smooth flow.
Reusing old reeds weakens performance. Saturated sticks lose absorption capacity and stop pulling oil upward. Replacing them improves scent throw improvement instantly.
Overfilling the bottle increases evaporation and spill risk. Maintain correct oil volume to keep diffusion stable.
Wrong placement affects results. Heat and airflow increase evaporation and reduce scent consistency. A stable location improves performance.
Mixing incompatible oils leads to uneven diffusion. Different viscosity levels disturb absorption and reduce aroma quality.
Skipping cleaning builds residue. This affects oil flow and overall usability.
Key mistakes to avoid:
- Using undiluted essential oil
- Reusing old reeds
- Overfilling the bottle
- Placing a diffuser near the heat or airflow
- Mixing incompatible oils
- Ignoring cleaning and maintenance
Avoiding these mistakes keeps fragrance consistent and improves overall diffuser efficiency.
Can You Use DIY Oil for Reed Diffuser Refill?
Yes, you can prepare your own DIY diffuser oil refill, but it requires the right balance and understanding of oil behavior. A poorly mixed solution often leads to weak fragrance or poor diffusion.
The key lies in the fragrance oil mixing ratio. A common guideline is around oil-to-carrier ratio (70:30), where carrier oil supports smooth absorption while fragrance oil provides aroma. This balance ensures proper flow through reeds and maintains consistent scent release.
Safety also matters. Proper essential oil dilution safety prevents overly strong or irritating aromas. Concentrated oils can become overwhelming in closed spaces, especially in smaller rooms.
DIY blends allow flexibility. You can experiment with different scent profiles and create natural home fragrance alternatives using lavender, citrus, or woody combinations. This approach supports custom scent blending during refill, giving a more personalized experience.
However, DIY options often differ from commercial blends. Ready-made oils are optimized for scent diffusion efficiency and consistent performance. They maintain stable evaporation and better longevity compared to basic mixtures.
Another consideration involves alcohol-based vs oil-based diffusers. Some DIY recipes include alcohol to increase evaporation speed, but it may reduce scent lifespan. Oil-based solutions provide slower, more controlled diffusion.
From a sustainability perspective, DIY methods support eco-friendly diffuser refill practices. They reduce packaging waste and encourage reuse of existing bottles. This aligns with the broader idea of refill vs replace diffuser, which lowers environmental impact.
If done correctly, DIY refills can work well. If consistency and performance matter more, commercial oils remain a reliable choice.
Conclusion
Refilling a diffuser is simple once you understand the basics. You clean the bottle, add the right oil, insert fresh reeds, and allow proper absorption. This small routine keeps your space consistently fresh without replacing the entire setup.
From my experience, choosing refill vs replace diffuser makes a noticeable difference over time. It reduces cost, minimizes waste, and gives better control over fragrance quality. When you follow the correct method, you also improve diffuser longevity optimization and maintain a balanced scent throughout your home.
Consistency matters more than complexity. Monitoring oil levels, replacing reeds at the right time, and maintaining proper placement ensures stable fragrance output. These small adjustments improve overall performance and create a reliable long-lasting home fragrance experience.
If you want a more refined and effortless setup, using high-quality oils and well-designed products makes a clear difference. You can explore premium home fragrance options from Lume & Wick to maintain better scent consistency and performance without frequent adjustments.